So, after years of promising myself I would, I finally created a native Mac OS X app. It’s a simple tool that scratches an itch I had but couldn’t find an adequate existing program for. It’s called YourSleeper and all it does is allow the user to set a timer after which iTunes will pause playback. It also gives the user the ability to fade the volume slowly so that the sudden cut in volume won’t perhaps wake him up. So far, it does exactly what I needed and no more, but I do have ideas for expanding its features. I figured it was a good way to dip my toe in the Mac App Store before I get to a few other itch-scratching apps I have ideas for.
YourSleeper is implemented as a menu bar app, so it’s always available to the user after it’s launched without taking up any dock space, so the first Cocoa technique I had to learn was how to create a menu bar app. I did find a few tutorials that would take the user through the steps, but most of them seemed to either assume more knowledge than I had or were a bit obsolete. The most helpful one was a YouTube video by CCoding, which is what I eventually used. This is an attempt to both update that tutorial for Mavericks/Xcode 5 (we’ll be using properties and image assets) and put it into an article format, which is what I would have preferred.
First, some technical prefacing. In Cocoa, that bar across the top of the screen, for some reason, is called a “status bar” instead of a “menu bar,” as I’ve always referred to it, perhaps because for these purposes, it’s meant to show status menus, such as the volume or bluetooth controls that Apple provides. So the class that gives us access to this is NSStatusBar, which has only one class method, the apparently singleton +systemStatusBar.
The items within the status bar are then, not menus or menu items, but “status items”, and we’ll be creating an instance of NSStatusItem by sending the -statusItemWithLength instance method to the system’s status bar. The length parameter is sent NSVariableStatusItemLength, which makes the length of the status item however large it needs to be for the contents (i.e., image) we attach to it, or NSSquareStatusItemLength, which makes the length the same as the status bar’s height. I’d be curious as to when that second would be useful.
Our status item will need a menu attached to it and there will need to be a few menu items in that menu for testing. After connecting actions and outlets, the code itself is very straightforward.
I’ve made a github repository of the project available.
Begin by creating an OS X Cocoa Application in Xcode. I’ve given my project the object prefix of “MBA”, so take note of that when I refer to the files and classes. Open up MBAAppDelegate.h and define the following properties and a single action:
@property (readwrite, retain) IBOutlet NSMenu *menu;
@property (readwrite, retain) IBOutlet NSStatusItem *statusItem;
- (IBAction)menuAction:(id)sender;
Open up the XIB file and drag a new menu from the Object Library in the Utilities panel onto the Document Outline or onto the work area in the middle. The menu will by default have three menu items included. Rename the first one “Menu Action”, the second “Quit” and delete the third. Attach the “Menu Action” menu item to App Delegate’s -menuAction: action and the “Quit” menu to the Application’s -terminate: action. Attach the App Delegate’s menu property to the new menu.
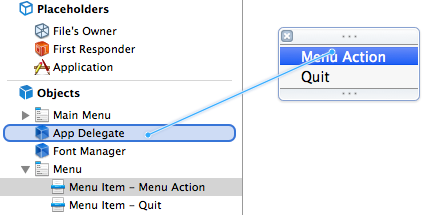
While you’re in the XIB file, delete the window that’s added by default. If you want to make use of it later, instead, select the window and uncheck “Visible At Launch” in the Attributes Inspector.
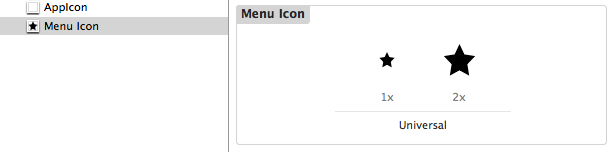
Click on Images.xcassets and create a new image set. Give the new image set a name of “Menu Icon” (the name is important, you’ll reference this is a bit). Either create, download or use the sample project’s image file and drag it to the image wells for the new image set.
Edit MBAAppDelegate.m to read as follows:
#import "MBAAppDelegate.h"
@implementation MBAAppDelegate
- (void)awakeFromNib {
_statusItem = [[NSStatusBar systemStatusBar] statusItemWithLength:NSVariableStatusItemLength];
NSImage *menuIcon = [NSImage imageNamed:@"Menu Icon"];
NSImage *highlightIcon = [NSImage imageNamed:@"Menu Icon"]; // Yes, we're using the exact same image asset.
[highlightIcon setTemplate:YES]; // Allows the correct highlighting of the icon when the menu is clicked.
[[self statusItem] setImage:menuIcon];
[[self statusItem] setAlternateImage:highlightIcon];
[[self statusItem] setMenu:[self menu]];
[[self statusItem] setHighlightMode:YES];
}
- (IBAction)menuAction:(id)sender {
NSLog(@"menuAction:");
}
Finally, select your project in the Project Navigator and click on the Info tab. Add a new key, “Application is agent (UIElement)” and set its value to “YES”.
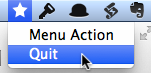
That’s really all there is to it. If you run the app now, the menu icon should appear in your menu bar and both menus should work, but there will be no icon in the dock.
Comments
Leave a Reply
*
Be the first to comment.