Here’s the first article in a series I wrote for About This Particular Macintosh. The series was aimed at novice FileMaker users and took a tutorial format. There were 12 articles in the series, and I plan to continue with additional articles after I’ve republished the existing ones.
Welcome to FileMaker
FileMaker is a very popular database management applicaiton. There are a number of reasons for its popularity, but two of them that stand out are its relative ease of use and its power. I first began using FileMaker back in 1994 when I worked as an IS director for an LA advertising agency. I needed to track the purchase orders I submitted to vendors. I created a database in less than an hour that I continued to use for the two years I worked there, and it did everything I needed. On the other hand, FileMaker is powerful enough to create complete applicaitons that can track all of the information a business or corporate department needs, and I’ve built quite a few of those over the years.
FileMaker has come a long way since 1994. In that time it’s become more powerful, while paradoxically retaining much of its ease of use. Although I still make much of my living by creating database systems with FileMaker for corporate and small business clinets, I also still use it to create very simple databases to track lists.
In this tutorial, we’re going to create a simple database with FileMaker 7 to track serial numbers. If you don’t already own FileMaker, you can download a demo version from the web site. Our database will be relational, which means that we’ll try to eliminate the duplication of any data.
What Is a Relational Database?
Relational database theory actually comes from the field of mathematics, but simply put it provides a way of thinking about data that helps ensure accuracy and helps eliminate the duplicaiton of data by dividing a database into tables or entities. For instance, in our serial number system, I can divide the data we wish to track into three entities: Publishers, Products and Serial Numbers. These entities will correspond to tables in FileMaker: Publishers, Products and SerialNumbers.
Tables are made up of fields and records. Fields hold individual pieces of data, such as the publisher’s Web address, the product’s version number, and the expiration date of the serial number. Records are collections of data about one individual entity, so in our serial number database we might have a record in the Publishers table for Microsoft and another record in Products for Microsoft Office.
In a relational system, in addition to all of the fields we need to track our information, we need to include on additional field called the primary key field. The primary key field is special in that the data within it will never be duplicated. It allows any record within that table to be uniquely identified. To use our Microsoft Office example, we may have a separate field for the version number (v.X or 2004) so that there is no single field that uniquely identifies the record. Since no existing field can serve as the primary key field, we add a ProductID field and tell the system to automatically populate that field with a unique identifier.
We need to be able to uniquely identify any record so that we can link a record in one table to a record in another table. This will allow us to tell the system that the Microsoft Office record in the Products table is linked to the Microsoft record in the Publishers table. In the Products table we include a PublisherID field, but this one is not automatically assigned any value (as it would be in the Publishers table) and is therefore called a foreign key.
Given the above, each table (Publishers, Products, SerialNumbers) will include a primary key field (PublisherID, ProductID, SerialNumberID). In addition, the Products table will have a PublisherID foreign key field, and the SerialNumbers table will have a ProductID foreign key field.
While this doesn’t completely cover all of the concepts of a relational database, it’s enough of a beginning for us to continue with creating our database.
Creating the Database
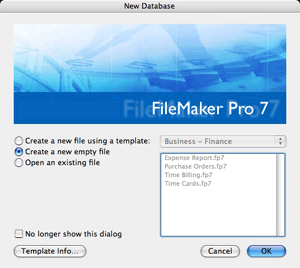
Now that we know how our database will be structured, let’s begin creating it. Open FileMaker. If you’re opening it for the first time (i.e., you haven’t yet turned the preference off), you’ll see the New Database dialog box asking if you’d like to create a file from a template, create an empty file, or open an existing database. Click the radio button for “Create new empty file” and click the OK button. A save dialog will appear where you can choose what to name the new file and where to save it. Choose SerialNumbers.fp7 as the name and pick a good place in your home folder to save the file.
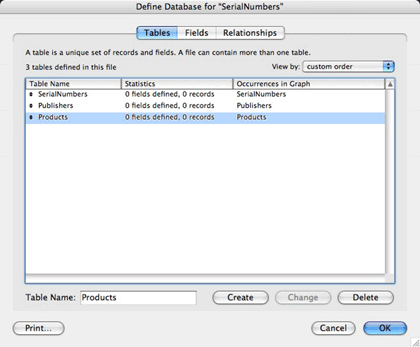
After FileMaker has finished creating the file, it will bring up the Define Database dialog box. This is where you specify how your database is structured, creating tables, fields, and relationships. FileMaker has begun by creating one table named with the same name as the file we created (SerialNumbers), which is a table we need, but we also need two additional tables: Publishers and Products.
Click the Tables tab at the top of the window. In the Table Name field type “Publishers” and click the Create button. Repeat this for the Products table. Your window should like something like this:
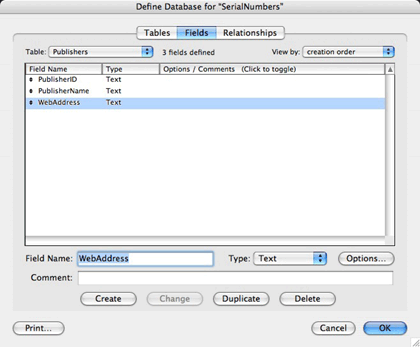
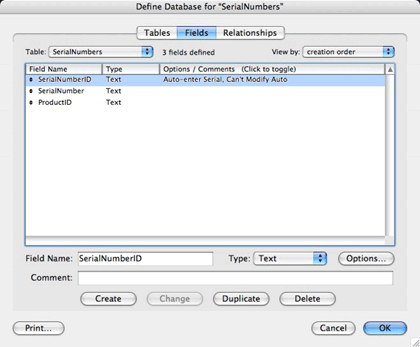
Now that we have our tables, let’s create some fields. First we’ll define the fields for Publishers. To do this, either double-click the Publishers row in the list of tables or select the Fields tab and choose Publishers from the Table pop-up menu in the upper-left corner of the window. Then type “PublisherID” in the “Field Name” text field and click Create. Repeat this process for the additional fields of “PublisherName” and “WebAddress.”
The PublisherID field is the primary key field, so we need to tell FileMaker to handle this field in a special way. Double-click the PublisherID field or select it and click Options. In the Options dialog box that appears, click the checkbox for “Serial number” leaving the options that are enabled after doing so with their default values (Generate on creation, next value 1, increment by 1). Also click the checkbox for “Prohibit modification of value during data entry.” Then click the OK button to save your changes to the field.
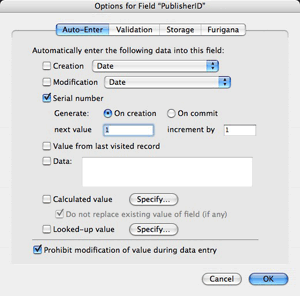
This tells FileMaker that the next time a record is created in the Publishers table to assign a value of 1 to the PublisherID field. The second time a record is created, assign a value of 2. In this way, each record will have a unique identifier that can be used to create relationships to this table.
Repeat these field creation steps for the Products and SerialNumbers tables. In addition to the ProductID field, the Products table will also need a field for ProductName and PublisherID. The ProductID field should have its options set to auto-enter a serial number just like the PublisherID field in the Publishers table, but the PublisherID field in the Products table is just a normal field with no auto-enter options set. Similary, the SerialNumbers table will need a SerialNumberID, a ProductID and a SerialNumber field with the same auto-enter options for the SerialNumberID as we applied to the other primary key fields.
Now that we have our fields, including our primary and foreign key fields, we can create the relationships between our tables. Click the Relationships tab. You’ll see that a table item has been created for each of our tables, and we can see the fields for each table listed. You may want to rearrange the table items so that they appear from left to right:
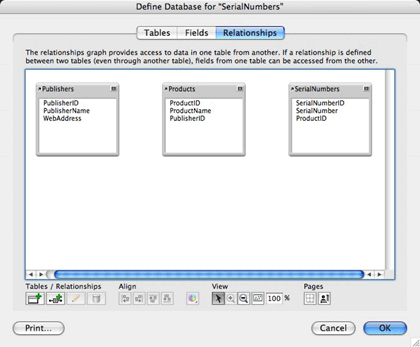
Notice that I didn’t call the boxes you see in the Relationships tab tables. They are table items or table occurrences. A database in FileMaker can have multiple table items for each table. The reason for this is beyond the scope of this tutorial, but simply put, when we create relationships, the path from one table item to another table item must be unique. There can’t be any circular relationships. If creating a relationship would create a circular path, a new table item is needed that points to the same table. We can cover such complex relationships in a future tutorial.
FileMaker 7 makes it very easy to create relationships by simply dragging from one table item’s field to the matching field in another table item. We are going to create two relationships, one between Publishers and Products and another between Products and SerialNumbers. We do this by specifying the match field of the relationship. Create the first relationship by dragging from the PublisherID field in the Publishers table item to the same field in the Products table item. This tells FileMaker that when a record exists in each of these tables and the values in these fields are the same, they are related. If we have a record for Apple Computer in the Publishers table and the PublisherID has a value of 1, then a record in the Products table for QuickTime Pro would be linked to that publisher by entering a value of 1 into the PublisherID field of that record.
Repeat the process of creating a relationship by dragging from the ProductID field in Products to the same field in SerialNumbers. Your Define Database dialog should look like this:
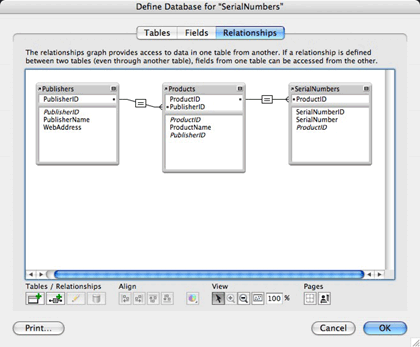
To indicate the relationships we’ve created, FileMaker displays a line connecting the match fields between the tables. Notice the line between Publishers and Products. There is a single line at the point it connects with the Publishers table, three lines where it connects with the Products table, and a box between the two table items with an equal sign in it. FileMaker has noticed that one of the fields we used in our relationship is a primary key (because it’s set to auto-enter a serial number) while the other field is a foreign key (because it does not have any auto-enter options set). This means that we could have many Products linked to a single Publisher record, which is what the three lines mean. The equal sign means that the relationship is established only when the fields match exactly. Other kinds of relationships, using inequalities such as greater than or less than, are also possible, but the default of “equals” is what we want for both of our relationships.
Congratulations! We’ve finished the design of our database and can now define how the database will look to users. Click the OK button to save your changes.
Creating the Interface
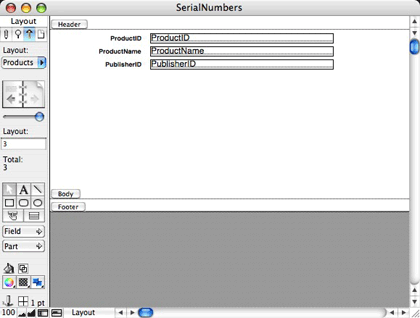
FileMaker presents data to users on layouts, each layout being assigned to a single table item. Because we created three tables, FileMaker has created three layouts, named appropriately enough after the table items they point to. FileMaker has also placed all of the fields in each table on the layout. We’ll keep this default setup, but we are going to change the behavior of the fields a bit.
When we are working with Products, we will want to be able to easily assign a Publisher to a Product by selecting the Publisher from a menu. Near the top left of the window for our database is a Layout pop-up menu. Choose Products from this menu and then choose “View ‣ Layout Mode” or press Command-L. We are moving from Browse mode, in which we edit the data within the database, to Layout mode, in which we alter the look of the database.
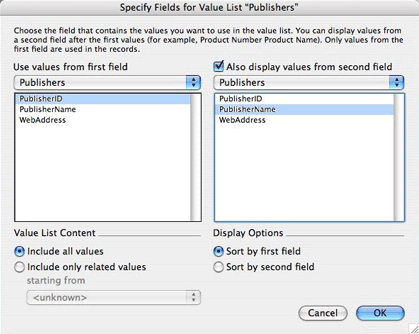
Click on the PublisherID field on the layout. The PublisherID field is to the right of the PublisherID label and will probably appear in a larger font than the label. Choose “Format ‣ Field Format” and you should see the Field Format dialog box. (If “Format ‣ Field Format” is disabled in the menu, then you have probably selected the PublisherID label rather than the field). Change “Format field as” from “Edit Box” to “Pop-up List.” For “Display values from” select “Define Value Lists” and click the “New” button. Enter Publishers for the value list name and click the radio button for “Use values from field.” In the Specify Fields for Value List dialog box, choose Publishers from the “Use values from first field” pop-up menu, and select the PublisherID field.
Click the check box for “Also display values from second field,” make sure Publishers appears in the menu below the checkbox, and select the PublisherName field. Save your changes by clicking the OK button in each of the dialog boxes until you’ve exited all of them and have returned the the layout.
Select SerialNumbers from the Layout pop-up menu. If you haven’t turned the confirmations off, you’ll see a dialog asking if you wish to save your changes to the layout. Click Save and click the “Save layout changes automatically (do not ask)” checkbox if you’d like to avoid these confirmations in the future.
Entering Data
We are now ready to create records and link records in one table to those in another table. Choose “View ‣ Browse Mode” or type Command-B to return to Browse mode. Use the Layout pop-up menu in the tool bar to view the Publishers layout. Choose “Records ‣ New Record” or press Command-N to create a new Publisher record. Notice that the PublisherID has been filled in with a value of 1, just as we defined it to do when we defined the database structure. Also notice that if you try to edit this field, you’ll be informed that it is not modifiable.
Click in the PublisherName field (to the right of the PublisherName label) and enter “Apple Computer,” press tab to move to the WebAddress field and enter “http://www.apple.com.” Create a few more Publisher records, perhaps three or four total. Notice that each time you create a record the PublisherID is incremented by 1.
Move to the Products layout and create a record in that table. Tab to the ProductName field and enter “QuickTime Pro.” Tab again, this time to the PublisherID field. Notice that a menu appears where you can select which publisher this product belongs to. Select the menu item with Apple Computer in it, and you’ll see that the number 1 is entered into the PublisherID field (because Apple Computer was the first record we created). Go ahead and create a few more products before moving onto the SerialNumbers layout and creating some serial numbers for your software and using the pop-up menu in the ProductID field to assign each serial number to a product.
Viewing Related Data
I’m sure you noticed a major deficiency in our layouts. Although we can assign a publisher to a product and a product to a serial number, we can’t see who the publisher is or what the product is. Let’s correct this.
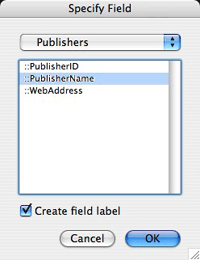
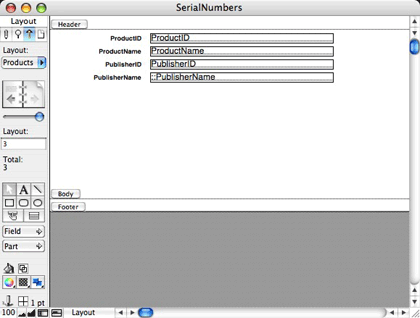
Return to the Products layout and enter Layout mode. In the toolbar on the left you’ll see a group of buttons, one of which is labeled Field. Click and drag this button onto your layout just below the PublisherID field. As soon as you let go of the mouse button, a Specify Field dialog will appear. From the menu at the top of the dialog, select the Publishers table, then select the PublisherName field and make sure the “Create field label” checkbox is checked. Click OK.
Resize the field by dragging the black handle in at one of the right side corners so that it’s about the same size as the PublisherID field. Return to Browse mode and you should see the name of the publisher that corresponds to the ID you chose in the PublisherID field.
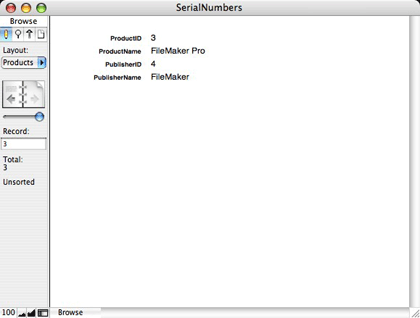
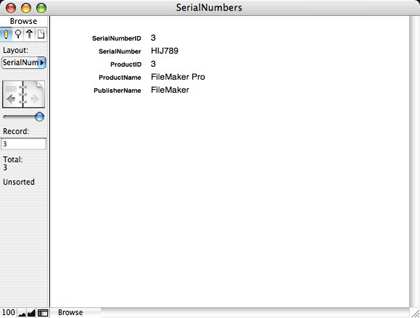
Repeat the above steps for the SerialNumbers layout, this time adding the ProductName field from the Products table item. If you recall, when we defined the relationships, we created a relationship from SerialNumbers to Products and from Products to Publishers, so we have a “grandparent” relationship from SerialNumbers to Publishers. Use the same technique outlined above to add the PublisherName field from the Publishers table item to the SerialNumbers layout. Create a few more serial number records and see how once you select the ProductID, both the ProductName and the PublisherName will be automatically displayed for you.
Let’s move to the other end of the relationship hierarchy. Move to the Publishers layout and enter Layout mode. Just above the Field button that we used to add a field to a layout is another group of buttons. The bottom row of these buttons contains two tools, one that looks like a button with a hand over it and the other that looks like a group of three horizontal bars. Select this second tool, which is the portal creation tool.

Remember that many products can be linked to a single publisher and many serial numbers can be linked to a single product. However, only one publisher can be linked to a product and only one product can be linked to a serial number. When viewing related publisher information from the products table, a single field is sufficient, but when viewing related product information from the publisher table, we want to be able to see multiple records. This is where a portal is used. A portal allows us to view multiple related records on a layout.
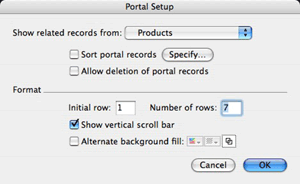
After you’ve selected the portal creation tool, click and drag in the layout to define the boundaries of the portal. As soon as you let go of the mouse button, the Portal Setup dialog box will appear. We are in the Publishers table and want to view information in the Products table, so choose Products from the “Show related records from” menu, click the “Show vertical scroll bar” checkbox in the Portal Setup dialog, and click OK. You’ll then be presented with an “Add Fields to Portal” dialog. We only need a single field in this case, so click the ProductName field and click the Move button, followed by the OK button.

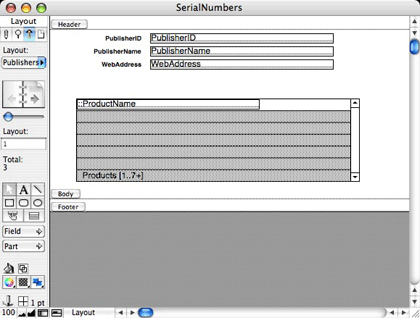
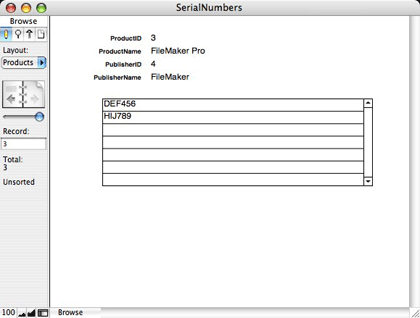
Return to browse mode and you should see all the products that have been linked to the current publisher. (You can use the book buttons in the toolbar to move from one record to another.) Perform similar steps to show the related serial number records on the Products layout.
So, what’s the purpose of all of these relationships, related fields, and portals? Remember, part of the reason is to eliminate duplicate data entry. If we own many products from a publisher, we don’t want to enter that publisher’s name many times. Also, if we need to change something about the publisher, we don’t want to have to go to every product record and change it many times. For instance, I entered “FileMaker” as a publisher, but the name of the company is actually “FileMaker, Inc.” Because we only entered the publisher’s name once within the Publishers table, I can change the name there and the new information will flow down to the products and serial numbers tables.
Good job! You’ve created a useful database system for yourself to track the serial numbers of the software you purchase. Please let me know if you have found this useful and would like to continue learning the complexities (and simplicities) of FileMaker. If there’s enough demand, perhaps this will be the first in a series of articles that will walk you through the topic. And, of course, feel free to e-mail me if you have any questions or problems.
Comments
Leave a Reply
*
Be the first to comment.